Recent albums
NGC 7538
Been busy this past week!
Been bouncing around a lot, my targets keep slipping behind trees and houses, so I schedule the computer to bounce to 2-3 a night. Ideally I just spend a couple nights on one, so not enough data to cancel all that background noise.
NGC 7538. Enjoy stars being born!

- Log in or register to post comments
- Album view
NGC 1491
NGC 1491
description on annesastronomynews.com
Might need to work on it more! Lots of background noise


- Log in or register to post comments
- Album view


Rings
Bentwood Rings, with a variety of stones and inlays


- Log in or register to post comments
- Album view
Harvey
The box says this:
First build as a blockade runner during the American War of Independence. The new U.S.A. government then armed them with canons to deal with the slave trade. Later on they moved many thousands of the population to California, and especially when gold was discovered there in 1849.
The advent of the extended railroads and the new sea passage of the Panama and Suez canal spelt their doom, as the new steamships could negotiate these channels
Blech.
I think somewhere I came across a specific history, built in the early 1800's cargo, outfitted with canons for defense against pirates, commissioned by the US navy c1840. Not sure where I read that...
Excerpts from the instructions (14 pages, plus 6 sheets of plans. good instructions and it all matches! {see the next ship why that matters])
Regarding the railings (which I didn't craft very well ):
Another good method of shaping, is to use the steam iron. this gives an adequate amount of moisture to shape the strips and also assists in drying it out to that shape. However, we have no wish to disrupt the harmony of the home, and you should incorporate the assistance of the important female side of the family using as much diplomacy as you can, and which we fell you are capable of doing as a valued client of Artesania Latina.
Regarding sails:
The next step is to stitch the hems. ... We realize that stitch sewing is not suited to male hands, and if you can incorporate some female aid here no doubt you will have an easier job but also a high quality job done. So use your natural diplomacy and charms to persuade the feminine part of the family to do te job for you, and if they have an electric sewing machine, it will a bevery easy job for them and no doubt you will be able to reward them for their help in making a good job for you.
I assume the reward is not dinner out? ;)
Regarding rigging:
Now at this point, we tried several times to try and describe the mounting of these working rigging lines, and try as we did, we always finished up with a description that would only serve to confuse the ancient mariner."
Ok, fun stuff.... PICS!


- Log in or register to post comments
- Album view
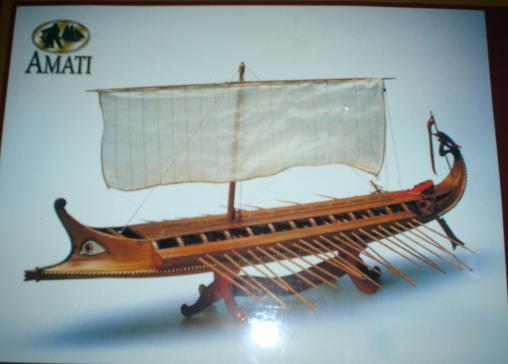
Greek Bireme
I ebayed this kit too. Oh, didn't mention that above? Yah, the Harvey was an Ebay find. New, unopened boxes, the kits 25-50% off retail - if you dig. Kickass.
If Artesania Latina is an example of a perfect company, with detailed instructions, how to's, wonderful plans, instructions matching plans matching box pics, Amati isn't.
The box shows light wood stained light red for the hull - the kit comes with dark walnut.
The plans are 2 sheets, with a sentence here and there. About 1.5 paragraphs total, very sketchy about what you're using. A pain, when the box shows a light wood used, the kit has bass and walnut, and the plans don't say which...
The plans shows wales under the oar shims, "Then apply the wales which must be shaped from mm 1.5x5 strips". Box pic doesn't show that. Pics online of other people's creations don't show that. Unless.... the wales are the brass strips!
Plans show the wales (?) of the rectilinear design (I don't know the name for that pattern), curved up at the stern. Box pic shows the rounded trim. The rectilinear pattern can't be curved the way the plans show - at least not by me, and I haven't seen anyone doing it. So then I though, maybe I'll run it along the waterline and not up - the trim is too short to run the length of the boat anyway!
I quite this project 3 times before I gave up on much of the plans and figured out my own way...
The walnut is 2x thicker than the wood for the Harvey - bent along tighter curves. ummmmm
As for that last - looking online, people have managed to curve the walnut in those curves around the stern. I couldn't. A week of soaking, and the wood would break. So.... I cheated! Spliced parts, and curved wood the easy way, laminated, and carved down. Which I had thought of that laminate idea earlier.
Screwed up the bottom hull. But it still looks damn good. Come to think of it... With the troubles I was having, i looked around online fr some pics. Damn greeks. Come to find out, 3000 years ago they weren't interested in taking photographs of their boats.
Planking the side was a pain. This boat is a very stable design - which meant that propped up on the side, she'd fall sternal. I'd wedge her between blocks, shed levitate herself on top of them, right side up. Quite impressive.
In the pic, they nailed the planks on, then removed them. The resulting holes imitate nails nicely - but I wanted something a little different. I decided to leave the nails in. First off - not enough nails. Not even enough for me to nail planks in and take out to reuse, as I'd lose some in the process. So I bought a bunch. Big change from the Harvey, where there were more nails than needed... Second... put those nails through the planks on the oar shims, and they're big enough so split the frames. I should have looked further, and seen how other people built her...
Ok.... PICS!


- Log in or register to post comments
- Album view
Reaver
This was sold as Captain Kidd's ship, the Black Falcon: Kit.
I had a question about planking pattern, started looking around. Found a couple of slight problems:
1: the model in question has elements of ships built in the mid 1800s. Kidd was hung in 1701.
2: Kidd's ship was the Adventure Galley. He captured the Quedagh Merchant, renamed the Adventure Prize.
So I bought some books on rigging, reworked the kit. This is a completely fictitious ship (well, so was the Back Falcon!), but a reasonable representation of a ship from 1625: still has the spiritsail topsail, lateen sail, simpler riggin on the lateen sail, no jibs nor staysails.


- Log in or register to post comments
- Album view